
Building conversations
A conversation is a graph of nodes joined by links. This page covers how to grow one, how to shape it — choices, group nodes, loops, jumps — and the layout tools that keep a two-hundred-node argument readable.
Writing inside nodes
Section titled “Writing inside nodes”Every node card shows its title, who speaks to whom, the dialogue, and the menu text when the node is a choice. You can edit the two text fields in place: double-click the dialogue or the choice text on the card, type, and press Enter (Esc cancels). For everything else, select the node and use the Inspector.
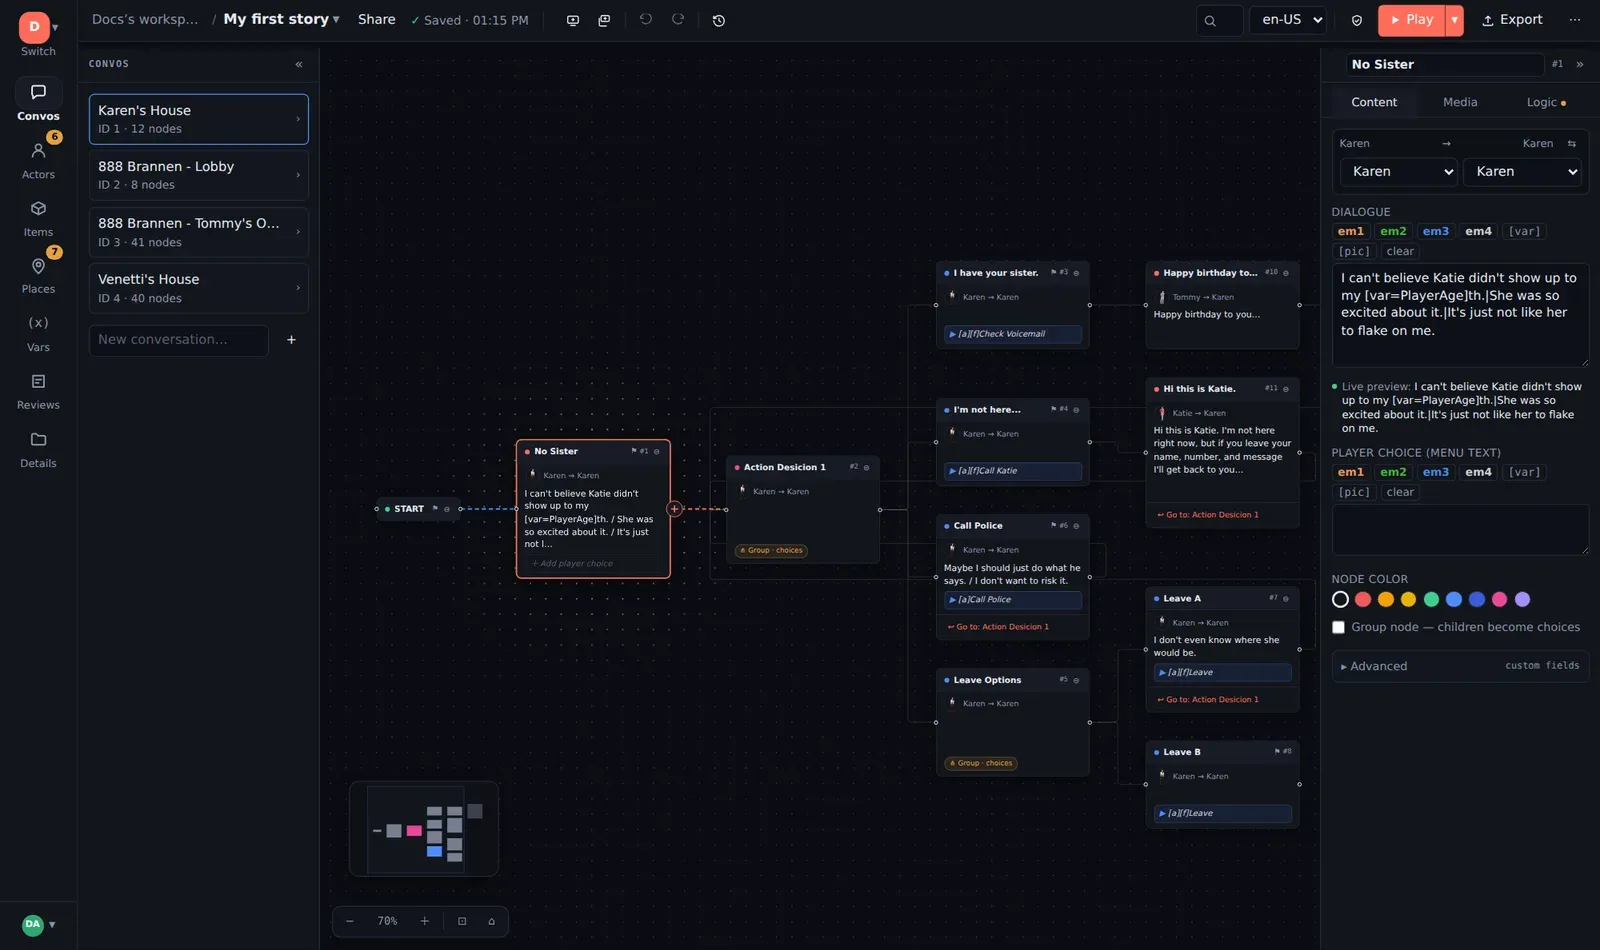
A node’s title is for you — it labels the card and never shows to the player. Leave it blank and the card is labelled by its number.
Actor → Conversant is who speaks and who listens. Set them once on the conversation (in Convos → conversation properties) and new nodes inherit sensible defaults; the ⇄ button swaps them on a node.
Adding nodes
Section titled “Adding nodes”There are several ways, and they all produce the same thing — a new node linked under the one you started from:
- Select a node and press Tab (child) or Enter (sibling).
- Click + Add player choice at the bottom of a card.
- Drag from the + handle on a card’s right edge and drop on empty canvas.
- Right-click the node → Add child node or Add child group.
- Add node / Add group in the toolbar.
Double-clicking empty canvas deliberately does not create a node: an unnoticed blank node next to START silently swallows a whole conversation, so nodes are only ever added on purpose.
Choices
Section titled “Choices”A node with two or more children presents them to the player as a menu, using each child’s Player choice (menu text). A node with one child plays straight through. That is the entire branching rule; there is no separate “choice node” type.
- Order the choices with Ctrl+↑ / ↓ on a child. Sibling order is menu order.
- A single choice normally plays without a menu. Prefix its menu text with
[f]to force a one-button menu — useful for “Continue…” beats. - Prefix menu text with
[a]to mark it as an action (“Walk away”) rather than a spoken line. Engines can style these differently.
Group nodes
Section titled “Group nodes”A group node is a container: it is never spoken, and its children are offered as the choice set. Use one when you want a labelled decision point on the canvas rather than choices hanging directly off a line of dialogue, or when several lines should share one condition or script. Tick Group node — children become choices in the Inspector, or right-click → Make group node. Group cards carry a Group · choices badge.
Connecting and reconnecting
Section titled “Connecting and reconnecting”- Link two existing nodes: drag from a card’s + handle and drop on the other card.
- Re-target a link: drag the arrowhead end of an existing link onto a different node.
- Insert a node in the middle of a link: click the link to select it, then Insert node here in the Inspector.
- Delete a link: select it and press Delete, or use the Inspector.
Loops, merges and jumps
Section titled “Loops, merges and jumps”Nothing says a link has to go to a new node. Link back to an earlier node to loop (a hub the player returns to after each question). Link several nodes into one to merge paths back together. And link into a different conversation — right-click → Link to conversation…, or the Inspector’s Logic tab — for “now go and talk to the harbour master”. A card that links elsewhere shows a Go to: line at its foot.
Moving branches around
Section titled “Moving branches around”The clipboard works on subtrees, not just single nodes:
| Action | Where |
|---|---|
| Select subtree | Right-click a node. Selects it and every descendant. |
| Cut / Copy | Ctrl+X / Ctrl+C, or the context menu. |
| Paste as children | Puts the clipboard under the selected node. |
| Paste & splice | Inserts the clipboard between the selected node and its existing children. |
| Paste here | Right-click empty canvas: paste as a detached branch you link up afterwards. |
Pasted nodes get fresh IDs; links inside the pasted branch are preserved, links out of it to nodes you did not copy are dropped.
Colours and IDs
Section titled “Colours and IDs”Give a node a colour from the swatches in the Inspector or the context menu — red for unfinished, green for approved, whatever your team agrees. ⋯ → Show all node colours borders every card with its colour, as the SVG export does; Show node IDs puts the numeric ID in each header, which is what engine developers will ask you for when a line misbehaves.
Managing a large conversation
Section titled “Managing a large conversation”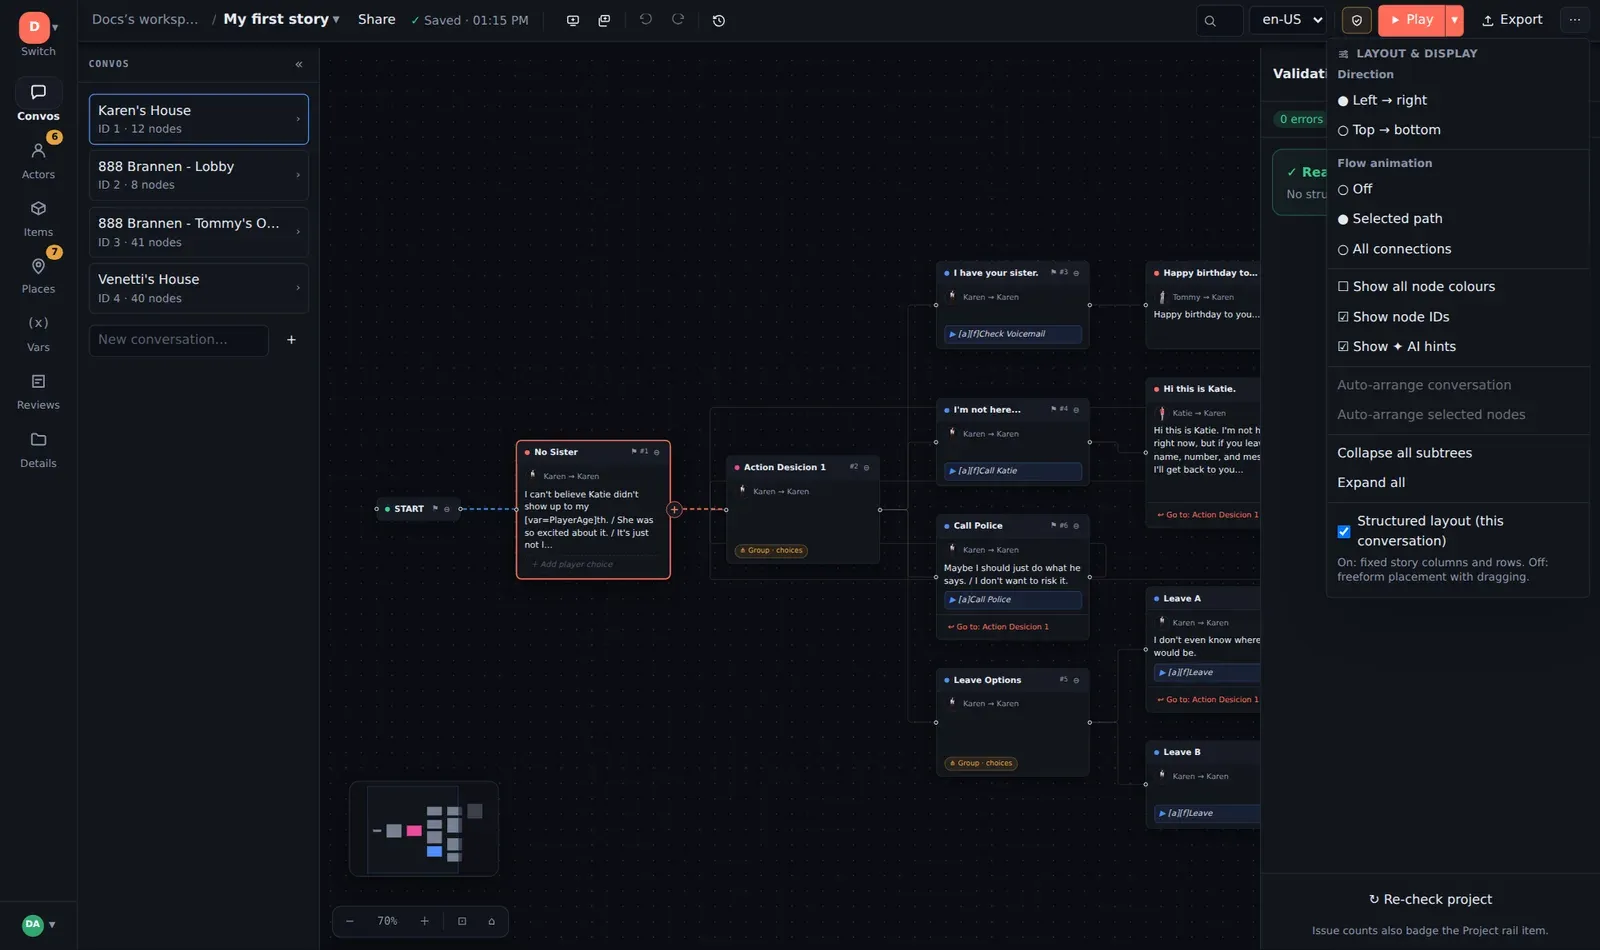
Minimap
Section titled “Minimap”The minimap in the bottom-left corner shows the whole conversation with the viewport outlined. Click anywhere on it to jump there. It is the fastest way across a big graph.
Layout direction
Section titled “Layout direction”⋯ → Direction flips the graph between Left → right (the default — reads like a timeline) and Top → bottom (reads like a flowchart, and fits wide choice fans better on a tall screen).
Structured layout — automatic placement
Section titled “Structured layout — automatic placement”With Structured layout on (the default for each conversation), ChatMapper places every node in fixed story columns and rows: each depth is a column, siblings stack in menu order, and the graph re-flows as you add or remove nodes. You never drag anything, and two writers see the same picture.
Turn it off to place nodes by hand. Dragging then works, positions are saved with the project, and the menu gains two commands:
- Auto-arrange conversation — lay everything out once, then keep hand control.
- Auto-arrange selected nodes — tidy just the branch you have been working on.
The switch is per conversation, so a hand-arranged hub scene can sit alongside auto-laid-out ones.
Collapse and expand
Section titled “Collapse and expand”Every node with children has a collapse toggle in its header. Collapsed subtrees fold into the parent with a count of hidden nodes, and links into a hidden node are drawn to the collapsed parent instead. ⋯ → Collapse all subtrees / Expand all work on the whole conversation. Collapsed state is saved with the project, so a conversation you tidied stays tidy tomorrow.
Flow animation
Section titled “Flow animation”⋯ → Flow animation animates the dashes along links — for the selected path only, for every connection, or off. Selected path is the useful one: it lights up the route into and out of the node you are looking at.
Conversation properties
Section titled “Conversation properties”Click the › on a conversation in the Convos panel to open its properties: title, description, default actor and conversant, plus any custom fields your project defines for conversations.
- Logic and variables — make later lines react to earlier choices.
- Keyboard shortcuts — the full list.